


1 Answer
Note: I wrote this documentation in v11. For this reason there is a probability that the name of menus mentioned in the doc are different or that some behaviors might change in a more recent version.
Employees
→ Employees Menu
Seeing or filling the information related to the employees
*Users with the access right ’employee’ for the employee module will only have the possibility to see the tab “work information” of each employee and won’t have the possibility to create a new employee or to update any information regarding an existing employee.
*Users with the access right ‘officer’ for the employee module will see the tabs ‘work information’, ‘Private Information’, ‘HR settings’ and will have the possibility to edit the information of the employees profiles and to create new ones.
* Users with the access right ‘Manager’ can see everything in this module.
- Possibility to add employee tags on each employee which can be useful to allocate leaves for a lot of employees at once or to help you to filter directly on a specific tag,...
-Work Information: General information about the employee (important to define the working hours type of this employee because it will have an impact on the Leaves App). Note that by default the working address is the company
-Private Information: Private and more confidential information on the employee (such as home address which is important when you refund expenses to this employee )
-HR Settings: information that can have an impact on other apps such as Timesheet and Leaves.
Very important to link the correct user of the database to this employee if this employee is a user of the database.
Note: To see the tab ‘Appraisal’ you need to install the Appraisal App. This appraisal tab will give you the possibility to define to which people the appraisal form will have to be sent and to define the periodicity of this Appraisal form.
→ Contracts Menu
- Give the possibility to manage the contracts of the employees and their status (the fields are just for information)
→ Department Menu
-Possibility to manage, update and create departments (how many as you need)
*Possibility to define the Manager of this department. The manager of the department will have to approve the leaves request of the employees who are in this department.
*Possibility to see the list of the employees which are members of each department, the list of the leave request, allocation request, expenses of the people of this department,...
Note: On the Employee page you can define the department of this employee in the tab ‘Work information’
→ Configuration Menu
* Allow you to define the default Company Working Hours
[in the pop up of the Company Working hours:
- what is the utility of the tab “Global Leaves” ? → Lister les public holidays qui ne seront pas pris en compte lors d’une demande de leaves par example. Ex : le 1er mai est férié donc on peut le mettre dans global leave et lorsqu’on fait une leaves request du 30/04 au 02/05 inclus ca va considerer qu’on prend 2jours et pas 3 car le 1Mai n’est pas compté.
- The smart button ‘Work Resources’ give you the possibility to see the list of the employees linked to this type of Company Working Hours]
* Allow you to decide if you want to display the Organizational Chart on the Employees form
→ In debug: you can see the menu ‘Employees tag’ and ‘Contract Types’
Leaves
Once the employees and the departments have been created in the database it will be possible to manage vacation and sick time (leaves).
By default several leave types are created in the system (you can see the list of these leave types under the Configuration Menu). This is possible to create new leave types or to change the configuration of these types.
For example if you tick ‘Apply double validation’ the allocation/leave requests for this type will require a second validation to be approved.
Once the leave types have been set and created you can start to allocate leaves: Menu ‘Leaves to Approve’ > Leaves Allocation (You can either allocate the leaves by employee or by employee tag if you want to allocate the same kind of leaves with the same duration to a specific group of employee).
When the allocation is approved, the employees can start using their days off by creating Leaves Requests.
To create a leave request: Menu ‘My leaves’ > Leaves requests > select some days off by clicking and dragging across the calendar. Then, in the pop up it is possible to add the type of leaves, and fine-tune the dates (for example if the employee select days off in the calendar from Apr.30 to May 2, he/she will have the possibility to change the duration in days from 3 to 2 because May 1st is a Public Holiday).
Note: this is also possible to create requests for days that have already passed (for example for sick leaves because you don’t know in advance when you will be ill).
Once the leave request has been sent, the Manager has to approve this request.
In Order to do that the Manager has to go on ‘Leaves to Approve’ > ‘Leaves’ > Then click on the Leave request and the manager can approve it.
Once the leave request has been approved it’s possible for the employee to get a report on the time off taken by going to ‘My leaves’, ‘Leave Summary’. It gives the possibility to check the remaining days available for example, or how many days have been taken already.
The manager can generate a report of the time off taken from ‘reports’ > Leaves by Department’: the report will be from the specified month until the present. This is possible to filter on the department and status of the leave types (Approved/Confirmed/Both). It will generate a PDF file (it’s possible to define the color in the report in the configuration of the leave type).
( In Odoo there is an approval process for the leaves:
1) Employee sending a request
2) His/her manager approves the leave
3) The HR responsible approves again and can then report it in the next pay slip )
Recruitment
Starting by creating a job position (configuration>Job Positions)
→Possible to define a person responsible for the recruitment. Even more important, this is also possible to add an email address which will be used by the applicants to send their resume (it will generate a new application in the pipe of this job position). You can also add a number that will be the expected new employees for this job position. In the Interview Form field it’s possible to choose a form which will be used during the interview phase.
As soon as you will click on save it will add this job position in the recruitment in progress stage by default.
In the Job Positions dashboard an overview of all the job positions will be displayed.
→ When you click on settings of the job position it’s possible to to see a resume of this job position. There is also a smart button ‘trackers’ that gives the possibility to see the channels where the applicants have sent their application. To set up you can select a source or create a new one and it will automatically generate an url that you can use on the specific channel you have selected. It’s possible to create trackers for as many channels as you want.
When the applicant will click on this link they will automatically be redirected to the job position and it will allow you to know exactly from which platform the applicant has access the job position
Note: When you publish a job application on your website and when someone is applying for the job it will automatically create a new application in the kanban view of this job position
When you click on a job application you can click on ‘create employee’ if you decide to hire this applicant and it will automatically create an employee form in the employees module. If you click on ‘create an employee’ it will add an employee on the settings of this job position (smart button) so it gives you the possibility to see how many people you have hired for this position so far. From the settings of the job position this is possible to stop the recruitment
Appraisal (+Surveys)
Surveys App gives you the possibility to create an appraisal form.
Each survey is made up of pages with questions on each page.
When you install the Appraisal app it will add an Appraisal tab in the Employees App (on the employee form) and it will give you the possibility to choose how to appraise each employee.
For example it will be possible to choose to whom the appraisal form will be sent, but also to select the type of appraisal form and the periodicity of the appraisal. → It will give the possibility to send an employee Opinion form to the manager of this employee and to send the employee appraisal form to this employee for example.
From the employee form in the Employees App it is also possible to create an appraisal manually when you click on the smart button “Appraisals” and then click on create to create a new one. It allows you to change the characteristics (deadline, forms,...) of appraisal than the one specified on the Appraisal tab. Once it’s done you can click on “Start Appraisal and send Forms” it will send an email to each people you have selected in the tab “Plan” (in this email they will get a link to the appraisal form that they will have to fill.
Once the Appraisal form has been fill in the HR manager (HR manager access rights) it’s possible to see the progress of the Appraisal (possible to see the status of the answers, to print the answers, results,...) when you go on the Appraisal app.
Résumé:
1) Créer le survey dans Survey App
2) Modifier les paramètres d’appraisal dans Employee App sur la fiche de l’employé
3) Une fois l’Appraisal envoyé possible de suivre le progrès et résultat de l’appraisal dans Appraisal app
Expenses
Setting expense type (Expenses App > Configuration > Expense products)
- Configure the expense types (managed as products in Odoo) that your company allows, from the Configuration menu. When a specific expense is reimbursed at a fixed price, set a cost on the product (ex: car travel expense) . Otherwise keep the cost at 0.0 and employees will report the real cost per expense (ex: restaurant, hotel,...)
→Don't forget to set an expense tax on each expense type (and an account if you use Odoo Accounting). It's usually a good practice to use a tax that is configured with Tax Included in Price (see: How to set tax-included prices).
That way, employees report expenses with prices including taxes, which is usually the expected behaviour.
→Note that you can specify unit of measures for your expense types (units, km, nights,...) if you activate the unit of measures in the sales app
Recording Expenses
2possibilities (manually or from an email):
-Manually
As an employee (Employee in user access rights), you can record expenses from My Expenses ‣ Expenses to Submit.
-From Email
It’s possible to set an email alias in the configuration of the Expenses App.
Once this email alias has been set up your employees can record their expenses from a simple email (it’s possible to add a receipt or a bill in attachment of this email).
Note: For security purposes, only authenticated employee emails (cfr. Work Email in employee detail form) are accepted.
Tip: The expense product can be set automatically if the mail subject contains the product’s internal reference between brackets [].
Moreover, if you type the expense amount in the mail subject it will set it on the expense too.
Submitting expenses to managers
Group message: When you are ready to submit your expenses to your manager (e.g. at the end of a business trip, or once a month), go to the menu My Expenses ‣ Expenses to Submit. Select all expenses from the list view and click on Action > Submit to Manager. Save the newly created expense report (i.e. set of expenses), and wait for your manager to approve it.
Individual message: You can also submit expenses one by one from the Submit to Manager button on the form view of an expense.
→All your submitted expense reports can be found in Expenses ‣ My Expenses ‣ Expense Reports.
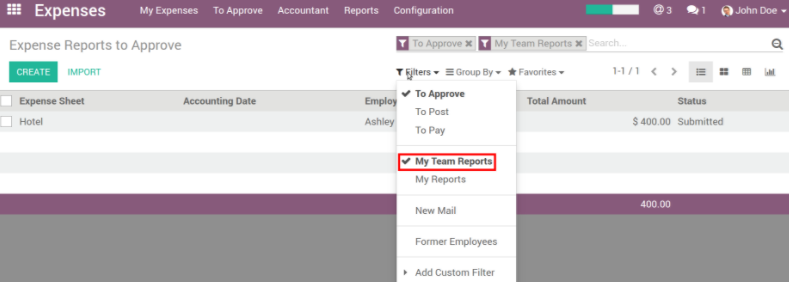
Approving expenses (HR and team managers)
HR and team managers get an overview of all expense reports to validate from the top menu To Approve ‣ Expense Reports to Approve. Such users must have at least Officers access rights for Expenses.
→They can review expense reports, approve or reject them, as well as providing feedback thanks to the chatter.
→ As a team manager it’s easy to find the expense reports of the team members. You need to be set as manager in the detail form (Employees App) of those employees.
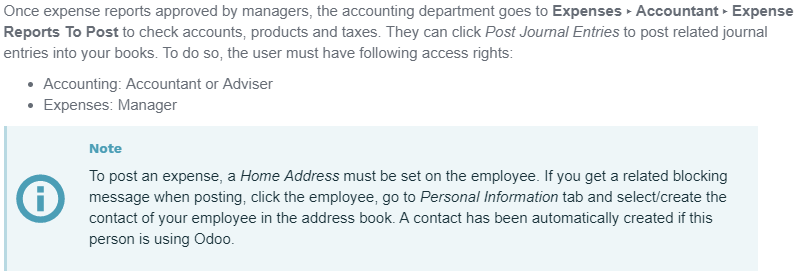
Posting expenses in accounting
Reimbursing employees
You can now see all the expense reports to reimburse in Expenses ‣ Accountant ‣ Expense Reports To Pay. To record the payment or pay by check, click Register a Payment.